
There is a specific kind of frustration that only a dull knife can provide. You’re in the kitchen, ready to prep a meal, but instead of gliding through a tomato, your blade squashes it. Not only is this inefficient, but it’s also remarkably dangerous. A dull blade requires more force, increases the risk of slipping, and turns a therapeutic task into a chore.
Learning how to sharpen a knife is a fundamental skill that bridges the gap between a frustrated home cook and a confident chef. In this comprehensive guide, we will dive deep into the mechanics of metallurgy, the psychology of the “burr,” and the step-by-step techniques required to restore a razor-sharp edge to any blade in your arsenal.
Why Sharpness Matters: The Science of the Edge
Before we pick up a stone, we need to understand what “sharp” actually means. At a microscopic level, a sharp edge is where two polished planes meet at a perfect point. Over time, use causes this point to fold over (rolling) or wear away (dulling).
The Danger of a Dull Blade
It sounds counterintuitive, but a dull knife is more dangerous than a sharp one. When a blade is blunt, it lacks “bite.” You end up using “sawing” motions or excessive downward pressure. If the blade slips under that pressure, you lose control. A sharp knife respects the food and your fingers by going exactly where you point it.
Understanding Bevels and Angles
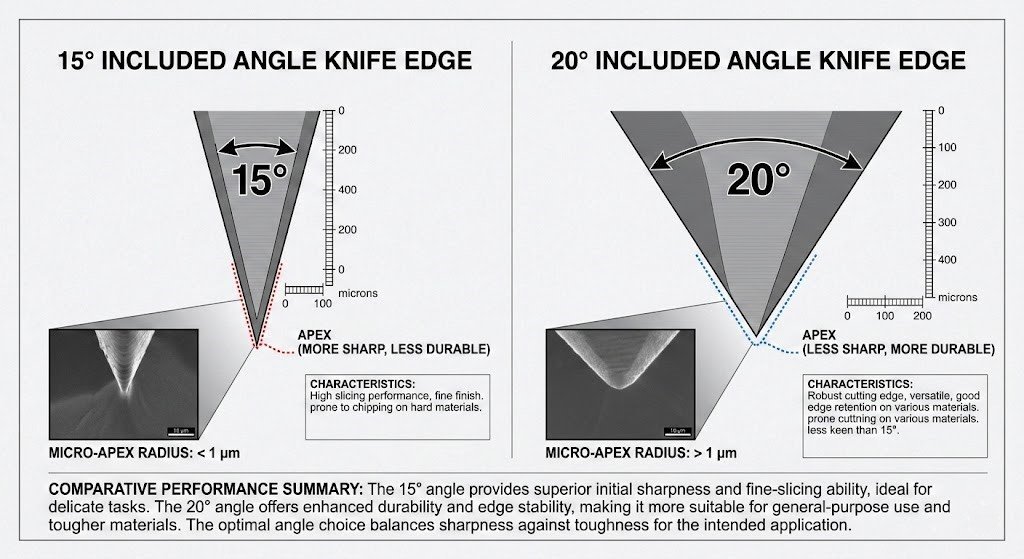
Most Western kitchen knives are sharpened to a 15° to 20° angle per side. Japanese knives often sport a steeper, finer 10° to 15° angle. Knowing your knife’s specific geometry is the first step in successful sharpening.
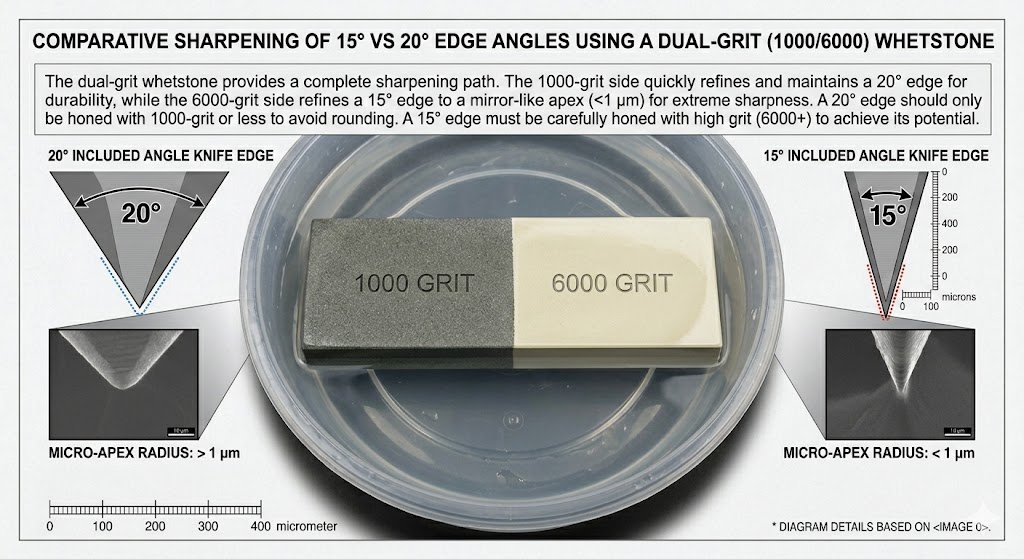
Visualization of different sharpening angles. A 15-degree angle provides a laser-like cut, while a 20-degree angle offers more durability for heavy-duty tasks.
Tools of the Trade: Choosing Your Equipment
You cannot achieve a professional edge with a pull-through sharpener from a grocery store. To do this right, you need the proper tools.
1. Whetstones (Water Stones)
This is the gold standard. Whetstones come in different “grits” (coarseness):
- Coarse (400 – 800 grit): For repairing chips or reprofiling a very dull blade.
- Medium (1,000 – 3,000 grit): The workhorse grit for general sharpening.
- Fine (5,000 – 8,000 grit): For polishing the edge to a mirror finish.
Preparation is key. Most water stones require a 10-15 minute soak until air bubbles stop escaping to ensure a smooth sharpening surface.
2. Honing Rods
Often confused with sharpeners, honing rods (ceramic or steel) don’t remove much metal. Instead, they re-align the edge between sharpening sessions.
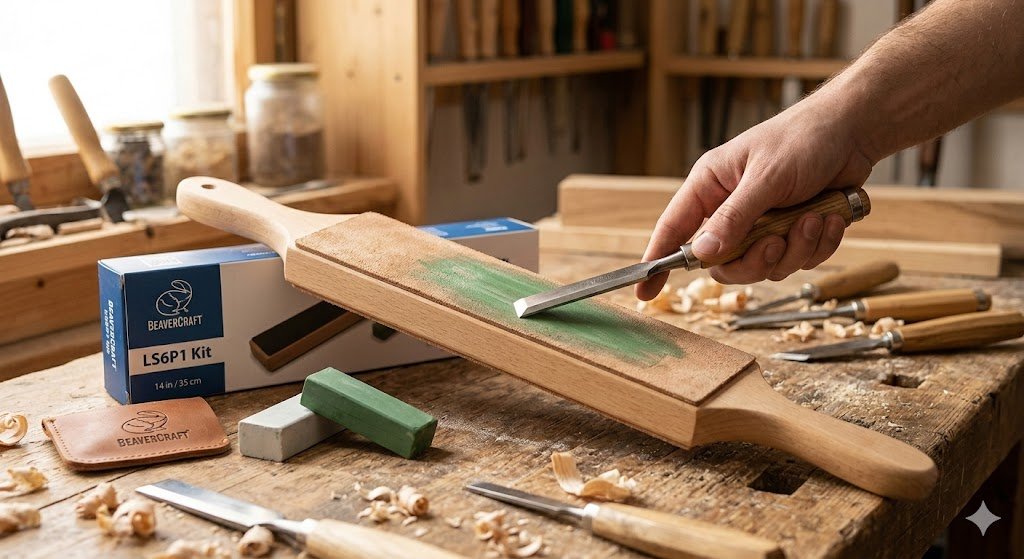
3. Leather Strops
The final touch. A leather strop, often loaded with a polishing compound, removes the microscopic “wire edge” left behind by stones.
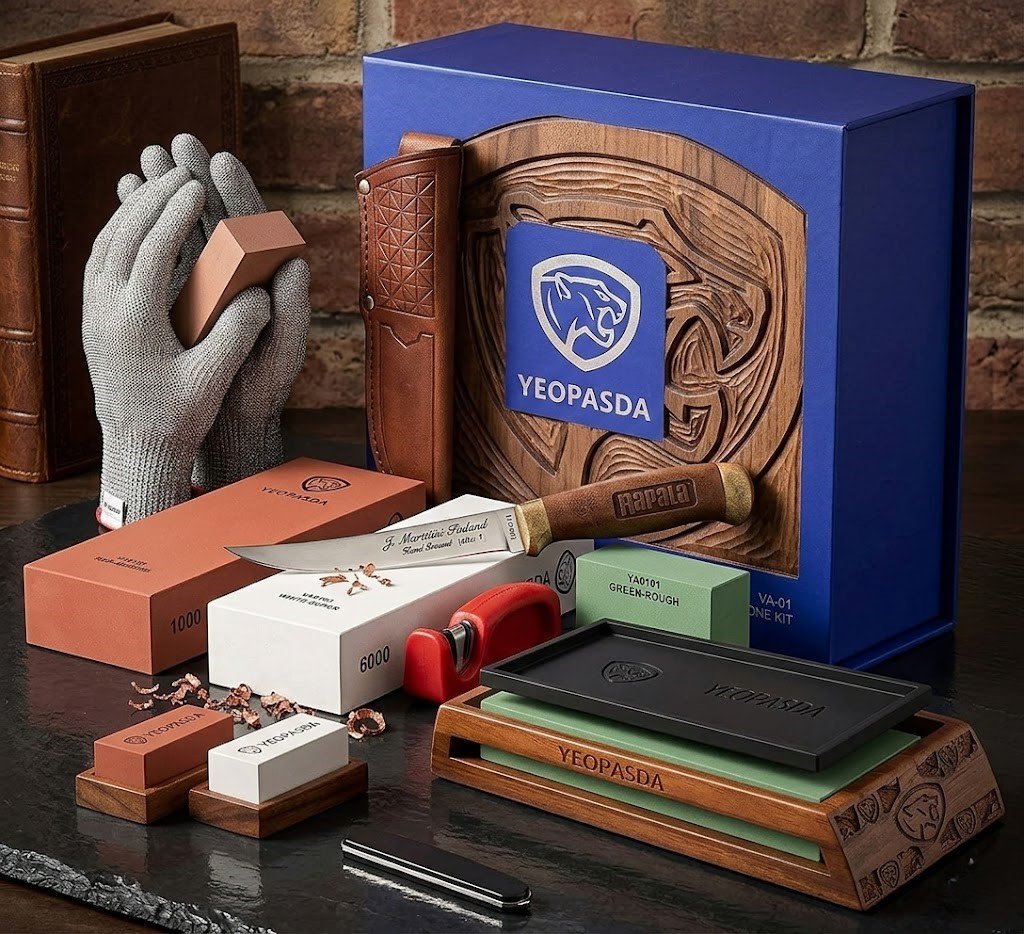
Expert Tip: If you are a beginner, start with a combination 1,000/6,000 grit water stone. It provides everything you need to go from dull to “shaving sharp” without a massive investment.
Step-by-Step: How to Sharpen a Knife Like a Pro
Sharpening is a meditative process. It requires patience and consistency. Follow these steps to transform your cutlery.
Step 1: Prepare Your Stones
Submerge your water stones in water for about 10–15 minutes until bubbles stop rising. Place the stone on a damp towel or a non-slip base to ensure it doesn’t move during the process.
Step 2: Establish Your Angle
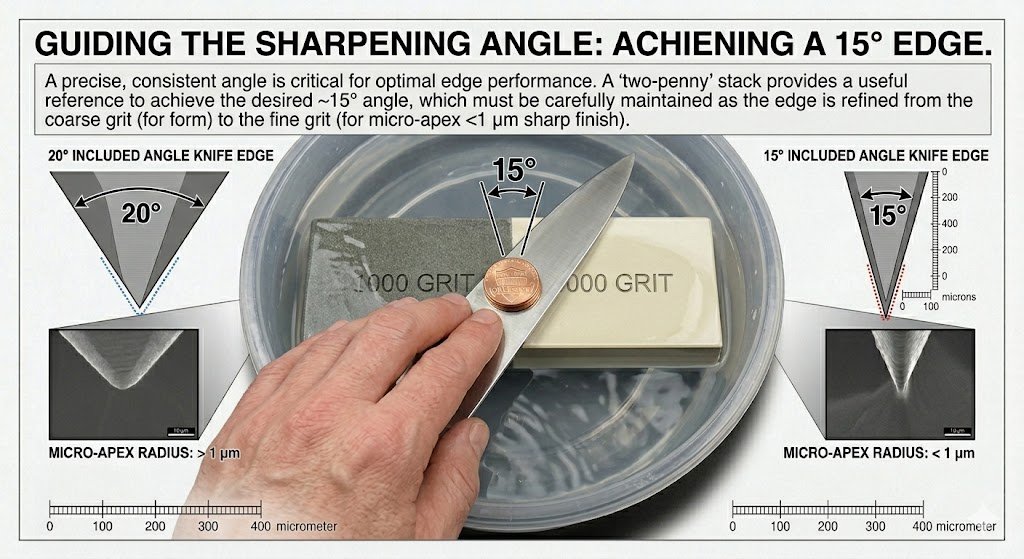
Place the heel of the knife at the end of the stone. To find a 20-degree angle, visualize a 90-degree angle (vertical), cut it in half to 45, and cut that in half again to roughly 22. Adjust slightly lower.
Pro Tip: If you’re struggling to find 20 degrees, stacking two pennies on the stone and resting the spine of the knife on them is a classic trick to find the right height.
Step 3: The Sharpening Stroke
Holding the handle with your dominant hand and using the fingers of your other hand to apply pressure to the blade’s edge:
- Push the blade away from you across the stone in a sweeping motion, ensuring the entire edge from heel to tip makes contact.
- Maintain the exact same angle throughout the stroke.
- Repeat this 10–15 times.
Step 4: Feel for the Burr
This is the most important secret in sharpening. As you sharpen one side, the metal will eventually fold over to the other side, creating a microscopic ridge called a burr. Run your thumb away from the edge on the unsharpened side; if it feels “catchy,” you’ve succeeded. Do not move to the other side until you feel a consistent burr from heel to tip.
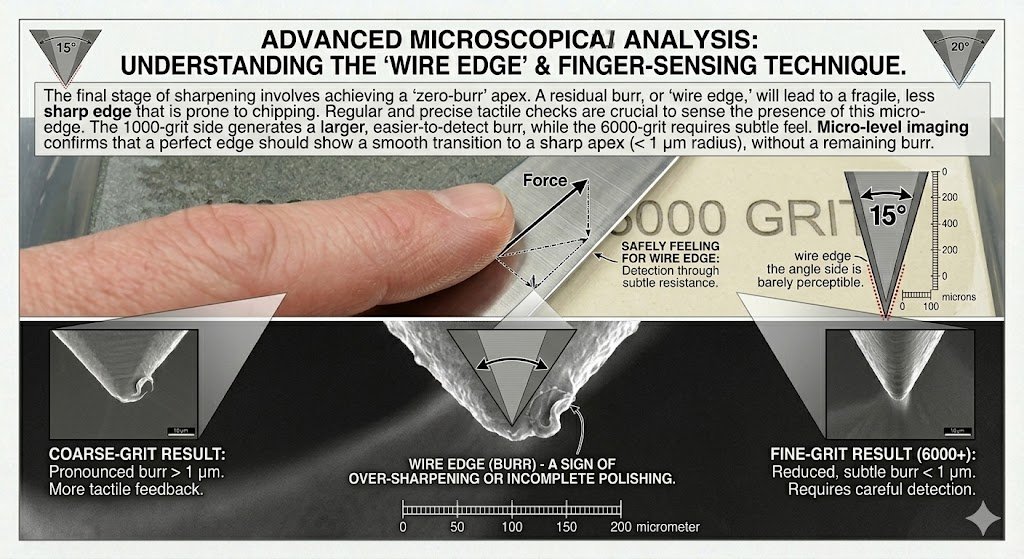
The Burr: This microscopic flap of metal is your signal that you’ve successfully sharpened one side and are ready to flip the blade.
Step 5: Sharpen the Other Side
Flip the knife and repeat the process. This time, you are pushing the burr back the other way.
Step 6: Polishing (The Fine Grit)
Switch to your higher grit stone (e.g., 6,000). Use lighter pressure here. The goal isn’t to remove metal, but to refine the scratches left by the coarse stone and create a smooth, mirror-polished apex.
Comparison of Sharpening Methods
| Method | Ease of Use | Edge Quality | Best For |
| Whetstone | Moderate (Requires Practice) | Excellent | All high-quality kitchen & pocket knives |
| Honing Steel | Easy | Maintenance Only | Daily realignment between sharpenings |
| Electric Sharpener | Very Easy | Fair/Good | Fast results for budget knives |
| Guided Systems | Moderate | Great | People who struggle to maintain a manual angle |
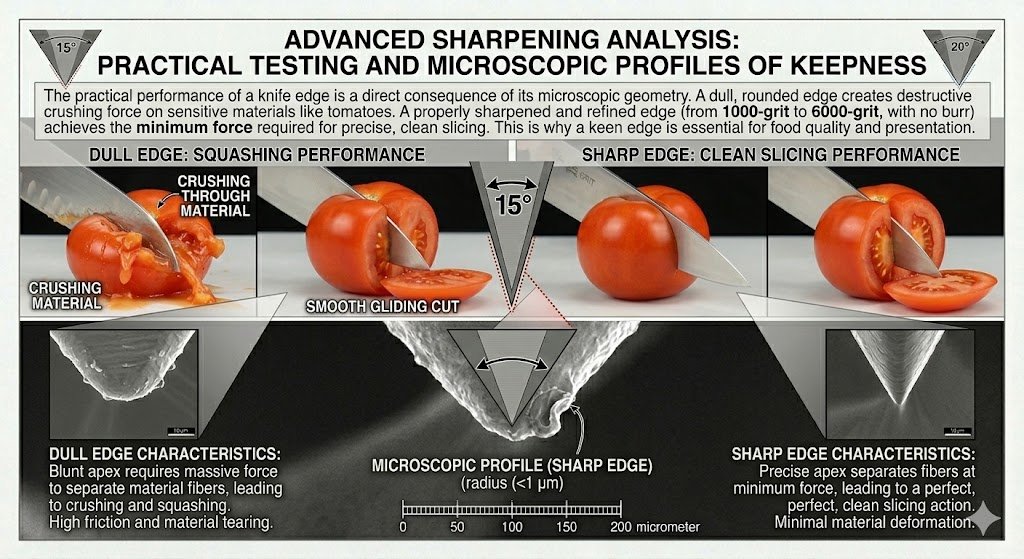
The ultimate payoff: A sharp edge allows for precision and safety, requiring almost zero downward pressure to slice through delicate produce.
Common Mistakes to Avoid
Even seasoned hobbyists make mistakes. Watch out for these pitfalls:
- Inconsistent Angles: If your angle wobbles, you’ll round off the edge rather than sharpening it.
- Not Creating a Burr: If you don’t form a burr, you haven’t actually reached the apex of the edge.
- Too Much Pressure: Let the grit of the stone do the work. Excessive pressure can flex the blade and ruin the geometry.
- Dry Stones: Using a water stone without enough lubrication can cause heat buildup and clog the stone with metal particles.
How to Maintain Your Edge
Once you’ve mastered how to sharpen a knife, you’ll want that edge to last.
- Hand Wash Only: Dishwashers are the natural enemy of sharp knives. The high heat and rattling against other dishes will dull the edge instantly.
- Use the Right Cutting Board: Stick to wood or soft plastic. Avoid glass, granite, or marble—these surfaces are harder than the steel and will chip your edge.
- Hone Regularly: A quick 10 seconds on a honing rod every time you use the knife will keep the edge aligned and extend the time between stone sharpenings.
Advanced Techniques: Thinning and Repairs
As you sharpen a knife repeatedly over years, the blade becomes thicker behind the edge. This is when thinning becomes necessary. You essentially lay the knife flatter on a coarse stone to remove “meat” from the cheeks of the blade. This restores the “laser-like” geometry that allows the knife to fall through food effortlessly.
For knives with chips or broken tips, a 400-grit diamond plate is your best friend. It removes material quickly, allowing you to reshape the profile before moving to your refining stones.
Finding Your Perfect Edge
Maintaining your tools is an act of respect—for the ingredients, for the craft of cooking, and for the tools themselves. A sharp knife doesn’t just make cooking faster; it makes it more enjoyable. Whether you are a professional chef or a weekend BBQ enthusiast, the ability to maintain your own equipment is a transformative skill.
Now that you’ve got the knowledge, it’s time to put it into practice. Grab your stones, find a quiet corner of the kitchen, and start feeling for that burr.
Staying prepared is about more than just having the right tools; it’s about knowing how to use them effectively when it matters most. From your kitchen to your outdoor gear, keeping your equipment in top shape is a hallmark of true craftsmanship.
Read More Guides: Best Field Dressing Knives of 2026: Field-Tested & Ranked
Frequently Asked Questions
How often should I sharpen my knife?
For a home cook using their knives daily, a full sharpening on stones every 3 to 6 months is usually sufficient, provided you are honing the blade regularly.
Can I use oil on a water stone?
No. Never mix the two. If a stone is designed for water, oil will clog the pores and ruin it. Similarly, if you have an “Arkansas stone” designed for oil, water will not work effectively.
Is it possible to sharpen a serrated knife?
Yes, but it requires a specialized tool called a tapered sharpening rod. You must sharpen each individual serration (the “gullets”) one by one.
How do I know if my knife is sharp enough?
The “Paper Test” is the standard. Hold a piece of printer paper vertically and try to slice through it with the knife. A sharp blade will cut cleanly without tearing or snagging.
What angle should I use for a pocket knife?
Most pocket knives and EDC (Everyday Carry) blades benefit from a 20-degree to 25-degree angle. This provides a more robust edge that can handle tougher tasks like cutting cardboard or rope.
Why does my knife feel duller after sharpening?
This usually happens because you haven’t fully removed the burr. The “wire edge” can fold over, making the knife feel blunt. A few light passes on a fine stone, or a leather strop, will usually fix this.
Conclusion: The Path to a Perfect Edge
Mastering how to sharpen a knife is a journey of muscle memory and sensory feedback. It’s about feeling the vibration of the steel against the stone and seeing the way light reflects off a polished bevel.
By following the steps outlined—choosing the right grit, maintaining a consistent angle, and ensuring you create a burr—you can achieve an edge that rivals any professional service. Remember, sharpening is a subtractive process; take your time, be patient, and respect the steel.
Start with an old practice knife, get a feel for the stones, and soon you’ll be the person everyone comes to when their kitchen tools need a new lease on life.